
Companies like Nest make installing smart thermostats simple enough that just about anybody can do it. You could also hire an expert if wiring isn’t your strong suit and you find the process complicated and intimidating. After all, those connections need caution, right?
If you recently got this smart thermostat, we’re giving you everything you need to know about its installation. Let’s get right into it!
Key Points
- Before starting, take a clear picture of your current thermostat wiring for reference.
- Use the compatibility checker tool at nest.com/works to get a custom wiring diagram for your system.
- After that, label the wires on your old thermostat before disconnecting them.
- Carefully connect the wires to your new Nest Thermostat and secure the Nest baseplate on the wall.
- If you don’t want to handle electrical wiring yourself, reach out to a Nest Pro or HVAC technician for installation.
Google Nest Thermostat Installation: Before You Begin

First, it is important to know that there are three versions of Nest thermostats: Nest Learning Thermostat (the flagship model), Nest Thermostat, and Nest Thermostat E. However, Nest discontinued selling the Thermostat E in America and Canada for regular consumers.
Today, most people only own the Nest Learning Thermostat and the Nest Thermostat. The installation process for the two models is very similar. But before we proceed with the installation, here is what you should do to prepare for the next steps.
1. Determine if Your System Is Compatible
To install a smart thermostat in your home, look at Google’s Compatibility Checker to determine if the model matches your current thermostat wiring. It is good that Nest’s website lets you check your current heating and cooling system compatibility before you buy the device.
Nest thermostats are primarily designed to work with most 24V HVAC systems, including heat pumps, boilers, air conditioners, and furnaces with either radiant delivery or forced air.
Your existing thermostat has high voltage and thus isn’t compatible with Nest thermostats if:
- It has thick wires with terminal blocks.
- It’s labeled 240 V or 120 V.
- Has stranded wires.
Learn why smart thermostats might not be helpful for you. Get easy-to-understand reasons before buying one for your home.
2. Gather Everything That Came in the Box
Ensure you gather all the necessary tools and materials required for the installation process. Luckily, every piece of equipment you need is included in the box, so this shouldn’t be a hard task.
Confirm that you have :
- Nest screwdriver
- Mounting screws and wire labels
- Steel plate
- Trim plate
- Nest Thermostat base
- Nest Thermostat display
- Installation manual
You should also have a drill driver and a 3/32” masonry drill bit if you are going to install the thermostat into harder things like brick, stucco, marble, or concrete.
3. Switch off Power to Your System
Turning off the power source to your HVAC equipment and thermostat is crucial before any wiring work. This simple step shields you from potential electrical harm and prevents the fuse within your system from blowing.
You can usually turn off the power by flipping a switch at your breaker box or fuse box labeled “furnace,” “heating,” or something similar.
Don’t overlook the fact that your heating and cooling system could have several breakers, so shut off each one before proceeding further. To confirm no electricity flows, adjust the temperature setting on your thermostat and wait a few minutes to ensure your system does not turn on.
4. Choose an Installation Area
Now might be the right time to carefully select the ideal installation spot for your new thermostat. Because a thermostat works best when it stays in one place, you need to place it in a good spot where you won’t need to relocate it later.
If you want your thermostat to run efficiently, try doing the following:
- Place it within the wireless range of the Heat Link (30 meters max).
- Make sure that your thermostat has a clear field of view.
- Avoid placing your thermostat in drafty areas or near heat sources.
- Choose a room or area that people in your home use the most.
5. Set Up the Nest Thermostat
You may not know this but setting up your new thermostat is very crucial before you get into the nitty-gritty of installation. To do so, you’ll want to download the latest Google Home App from your app store, create an account, or log in if you already have one.
After that, open the app, click the “+” symbol in the top left corner of the screen, and then choose “Set up device” from the provided options.
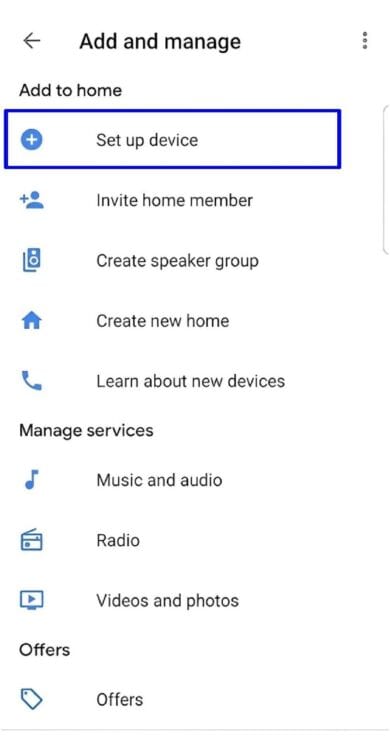
You will see two options: “New devices” or “Works with Google.” Click “New Devices” and create a new home, or select an existing home you already have in the app.
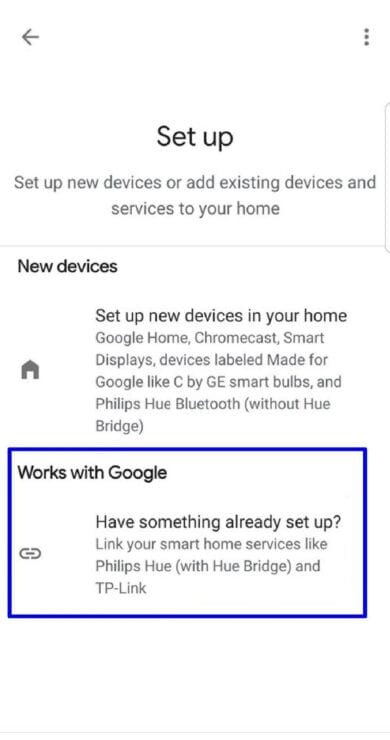
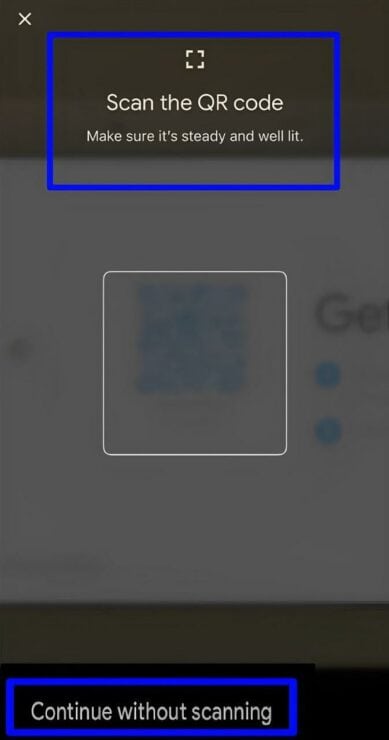
The page will load a list of categories where you should pick “Thermostat” and then “Nest Thermostat.” After that, grab your phone and scan the QR code on the rear of the display. Alternatively, you can input the thermostat model and continue without scanning.
Once you add your Nest thermostat, the app will guide you through installation and ask a series of simple questions about your thermostat wiring. Answer them as accurately as possible.
How to Install Google Nest Thermostat: In 8 Simple Steps
Nest Thermostats are easy to install, and you can get started using the steps we’ve listed below. But, if your home lacks HVAC or you aren’t comfortable with electrical wiring, it’s best to get help. Contact a Nest Pro or HVAC expert for assistance with the installation process.
Step 1: Unscrew the Thermostat’s Cover and Take a Photo
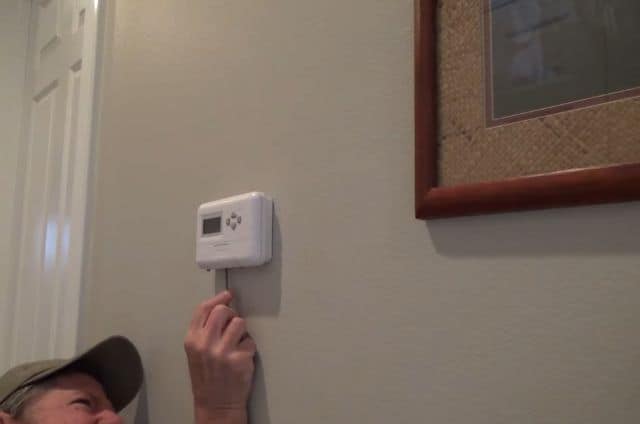
To install the Nest thermostat, the first thing to do is remove the faceplate from your old thermostat. Some thermostat covers snap off, while you have to unscrew others using a screwdriver.
You should be able to see the thermostat wiring after taking off its cover. Before touching anything, now is a good time to reach for your phone, take a photo of your current wiring, and save it for reference. Confirm that the image is clear and you can read the wire terminal labels with ease.
Step 2: Get a Wiring Diagram From the Compatibility Checker
Since each system’s wiring is different, you should get a custom wiring diagram for your Nest Thermostat installation.
To do this, head to the Nest website compatibility checker (nest.com/works) and enter your thermostat’s connector labels. You’ll receive a custom wiring diagram if your system is compatible; email it to yourself or print it.
Here are some details to ensure you get the right diagram for installation:
- Don’t enter any jumper wires into the checker.
- Enter only connectors that have wires on your thermostat.
- Use connector labels, not wire colors.
Step 3: Remove the Jumper Wires
This next step requires you to get rid of jumper wires (a short wire connecting two terminals) since Nest thermostats do not use them. If your wire connectors have two sets of labels, the Nest App will ask you some questions to help you figure out the type of label you’ll use.
After removing the jumpers, save them along with your old thermostat. That way, you’ll have everything you need to reinstall your old thermostat if you ever decide to move or uninstall the Nest thermostat.
Step 4: Label and Disconnect the Wires
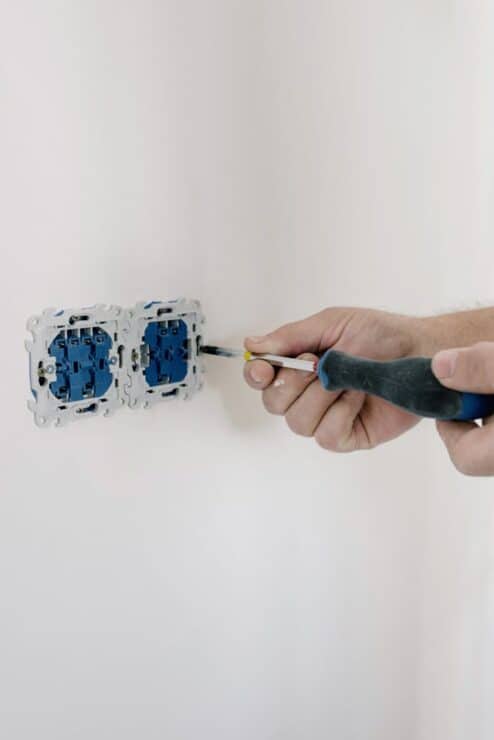
Get the sticker sheet that comes with the Nest Thermostat and wrap the labels to the matching wires on your old thermostat. You should see letters on every terminal on the back of the thermostat.
Ensure you use the label corresponding to the port to which the wire is connected so you’ll know where to connect it to on the Nest. For instance, if you have a wire going into a port labeled “G,” then stick the “G” label to that wire.
Here are some wiring tips to help you:
- Common or C wires are generally blue (Only some systems require this wire for power supply).
- If you have an Rc or Rh wire, label it R.
- If you have an orange wire labeled Y2, W2, or O/B, put the O/B label on it.
- Use the white labels for any additional wires if necessary.
After labeling the wires, you can now unplug them from the thermostat. Some wires will release when you push a button, while others will need to be unscrewed. Once you disconnect the wires, wrap them around a pencil to ensure they do not fall through the hole in the wall.
Step 5: Drill Holes
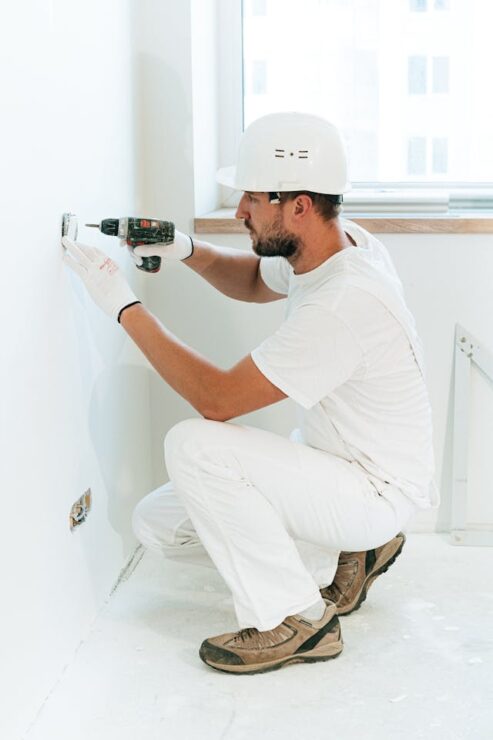
You’ll need to make new holes if the holes from the old thermostat do not line up with the new one. Simply place the Nest baseplate against the wall and use it as a guide to mark where you need to install the screws.
We recommend placing the thermostat about 1.2–1.5 m above the floor on a flat surface. Also, use the included bubble level to ensure the base is well-aligned before marking the screw holes.
You should know that the Nest screws are self-tapping, so there’s no need to drill holes into soft materials. But if you are installing on hard surfaces, use a drill and the masonry drill bit to create holes where you’ve marked on the wall.
After that, use the included trim plate to hide screw holes or scratches on your wall created by the other thermostat. You can even paint the trim plate to match the color of your wall.
Step 6: Install the Nest Base
Now, feed the wires through the center of the Nest base and use the two supplied screws to secure it to the wall. Only use the provided screwdriver to drive in the screws to avoid over-tightening or cracking the base.
After that, the next thing is to match each wire’s label to the corresponding label on the Nest baseplate. Remember that wiring diagram you got from the compatibility checker? Yes, you will be using it for this one.
Go ahead and press down on the connector button and insert the appropriate wire, each to its matching terminal. A tab at the end of the hole should snap once the wire is securely in place—the button should stay down if you do this step properly.
If the wire doesn’t stay down, take it out and straighten it. You may need to strip its end to expose enough copper before putting it back in.
Step 7: Attach the Display
After securing all the connected wires, push them down to make sure they are flush with the base. Ensure no wire is sticking out from the wall, as they can keep your thermostat display from connecting properly.
Then, pick up the thermostat display and line up its pin connector with the rectangular port at the bottom of the baseplate. Push the display onto the baseplate until it clicks into place.
Step 8: Switch the Power Back On
You can now turn the power back on at the circuit breaker. This should power on the Nest unit, from which point you can proceed with the setup.
If it does not power on, you will notice a red light blinking to indicate that the battery is charging. Wait for the battery to charge before connecting your thermostat to your Home app.
Finish the Setup & Start Using Your Device
Your thermostat is now installed and connected to the Google Home App, but you aren’t quite done yet. While it does take some time to configure, that’s OK because using a device like a Nest thermostat is a long-term play.
Once you turn the power back on, the Nest Thermostat will activate and continue walking you through the setup. This includes selecting your language, connecting to Wi-Fi, and customizing settings for your home, heating system, and what temperatures you like.
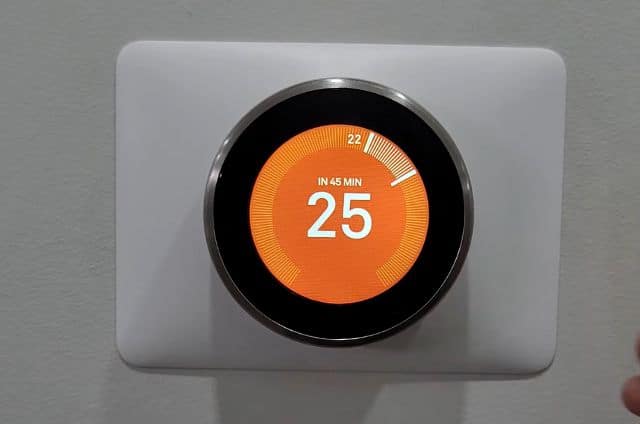
Keep in mind that Nest thermostats do not have a touch screen, so you’ll use them just like normal thermostats. If you desire cooler temperatures, rotate the ring downwards. Alternatively, turn the ring upwards for warmer conditions.
Understand what to watch out for with smart thermostats and geothermal systems. Get simple tips before installing one in your home.
Frequently Asked Questions
How Do You Set up a Nest Thermostat?
Open the Google Home App, click the “+” symbol in the top left corner of the screen, and then choose “Set up device” from the provided options. Click “New Devices” and create a new home, or select an existing home you already have in the app.
The page will display categories where you should pick “Thermostat” and then “Nest Thermostat.” After that, scan the QR code on the back of the display, and the app guides you through the remaining setup.
Do You Need an Electrician to Install a Nest Thermostat?
Installing a Google Nest Thermostat often doesn’t require an electrician. It’s typically an easy DIY project, one that may only take 30 minutes from start to finish. So you will probably be fine if you are comfortable with some basic wiring.
However, remember that incorrect wiring can lead to performance issues. You may want to hire an electrician to install the device if you are pretty unfamiliar with electrical wiring.
Does Nest Thermostat Use Jumper Wires?
A Nest thermostat doesn’t use jumper wires like conventional thermostats. Instead, it has an internal jumper connecting the Rc and Rh terminals. Before installing the Nest thermostat, it’s essential to identify which wires connect to your existing thermostat.
Bottom Line
Now that you’ve installed your Google Nest Thermostat, you are ready for Nest to help manage your day. As you can see, the installation is straightforward and even those with no wiring experience can do it smoothly. However, you can always contact Nest Pro if you ever feel frustrated or confused while installing your Nest Thermostat.
If you have any questions, feedback or suggestions about this article, please leave a comment below. Please note that all comments go into a moderation queue (to prevent blog spam). Your comment will be manually reviewed and approved by Tristan in less than a week. Thanks!