
Having Ring’s doorbell and security cameras around your property are great for feeling more secure and preventing burglaries, however they can make you feel self-conscious at times – especially if you’re relaxing in your backyard but a Ring outdoor cam is filming you 24/7, like the all-seeing eye of Sauron. Okay maybe that’s a bit of an exaggeration, but it is sometimes nice to switch off from being recorded – literally.
Thankfully you do have various options available to you to stop your Ring cameras from recording, either temporarily or permanently. Some rely on app features which are still being rolled out worldwide, however.
Keep reading for the text guide explaining the six options available to you, or feel free to check out my YouTube video for this instead:
Option 1 – Use Modes
Back in 2020, Ring rolled out an awesome new feature called modes, which allows you to say when you’re away or at home – and then set different camera behaviors based on this. For example, indoor cameras won’t record when you’re at home. This is a standalone feature in the Ring app, although it also automatically integrates with the Ring Alarm (meaning that if you leave home via the Alarm system, the cameras will adapt accordingly).
To turn this feature on, open the Ring app and you should see three icons at the top of of it – labelled “Disarmed”, “Home” and “Away”:

You can also go into the menu, select “New Features” and click modes – which will then explain to you what this feature does:
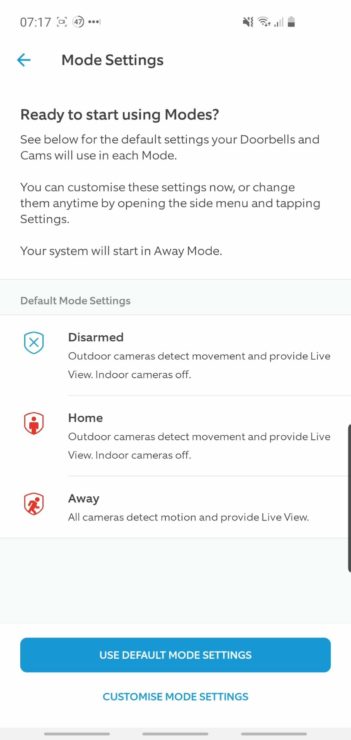
By default, your indoor Ring cams won’t record in ‘Home’ or ‘Disarmed’ mode, but other Ring cameras (and doorbells) will. All Ring cameras and doorbells will record as normal in ‘Away’ mode.
You can however customize this feature once enabled, by clicking into each mode where you can then select a camera to tailor the recording behavior of it in each mode:

With this, I could disable motion detection and live view capability for my Ring Doorbell Pro (when I’m at home). This feature is perfectly good for me and my requirements, but there are some shortcomings.
I don’t have an option to disable recording when the doorbell itself is pressed, and in theory any of the Ring devices could still record even with these settings turned off (because it’s a software option, not a physical change to the camera) – all you’ve done is turn off automatic motion recording and manual ‘Live View’ clicks.
Important Note: as of March 2023, Ring don’t allow you to use this feature unless you pay for a monthly Ring Protect subscription (starting at $3.99/month per device). That means that if you run your Ring system without a subscription, you won’t be able to use this option anymore.
If you don’t want to pay for the subscription plan, or you’re ultra-paranoid (maybe you’ve read the reports about Ring’s engineers watching your video feed without permission), keep reading for some other options.
Option 2 – Disable Motion Detection
You can also disable motion detection via the Ring app. So if, for example, you’re working or relaxing in your backyard, your Ring outdoor camera won’t keep recording every time you move. This might make you feel more comfortable in your backyard even under the ever-watchful Eye of Sauron (sorry, Ring).
To do this, simply do into the respective camera in your Ring app and turn off “Record Motion”:
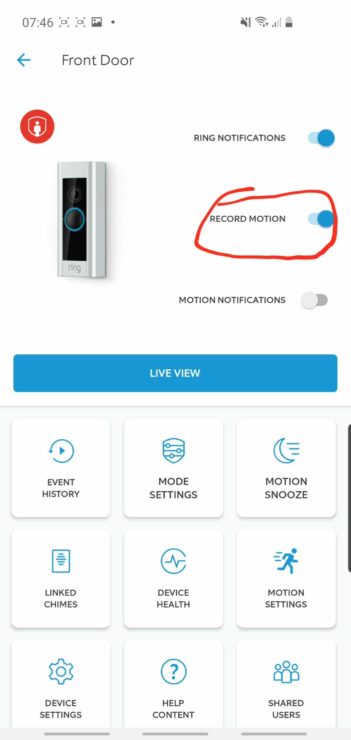
This will then stop recording you (or anyone else) every time motion is detected. You can then turn this back on once you’re done. It’s worth noting that if ‘Modes’ are enabled, you’ll get a little warning in the app saying that motion recording is now controlled by modes and so any setting changes will be reverted when you go to a different Ring mode. This is fine though, and you can still disable motion detection on an ad-hoc basis.
The other thing you might be tempted to try is to set a Motion Schedule under the Motion Settings section of a Ring device. This allows you to set when motion notifications will be paused:
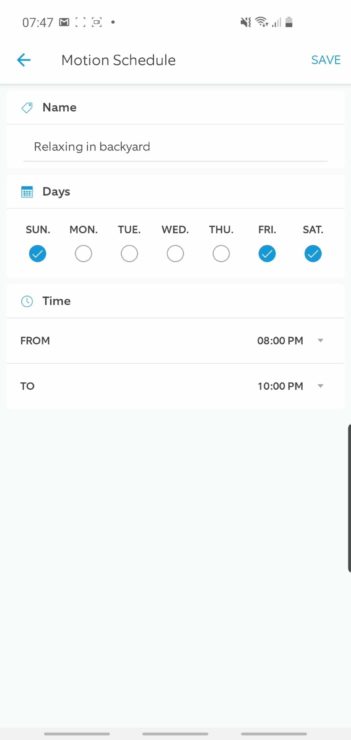
The key word there is notifications – unfortunately motion-based recordings still carry on. So this might be a useful feature if you simply find yourself being spammed by motion detections (especially at night when car’s lights may trigger it), but not if you want to genuinely stop yourself being recorded.
Option 3 – Turn The Power Off
The other option is to simply turn the power off, assuming you have a hardwired Ring doorbell (such as the Pro) or a plug-in Ring camera. There are two options here: firstly you could add a wall-mounted switch in when running power to your new Ring device:
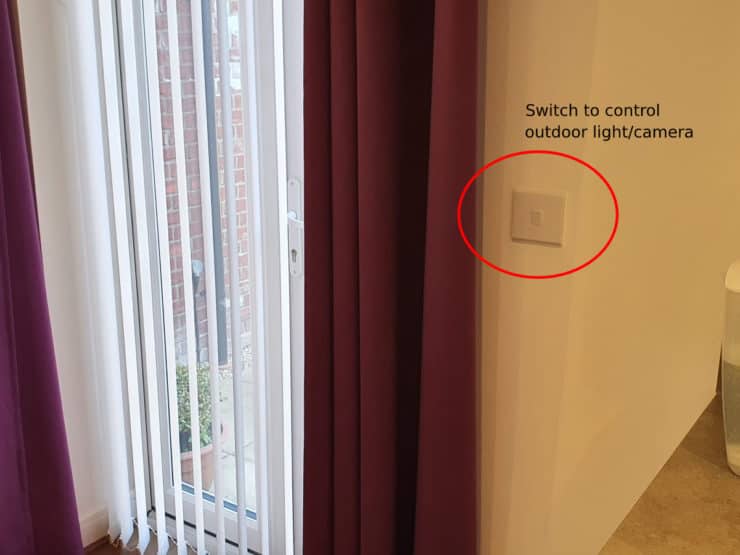
Then flipping this switch will cut the power to your outdoor Ring camera, stopping it recording. The downside, of course, is that you’ll need to spend more effort running cable, and this might not be practical if you’re just trying to swap an existing outdoor light with a Ring cam.
The second option is to turn power off to the whole circuit via your house’s electrical panel (called a consumer unit in some countries):
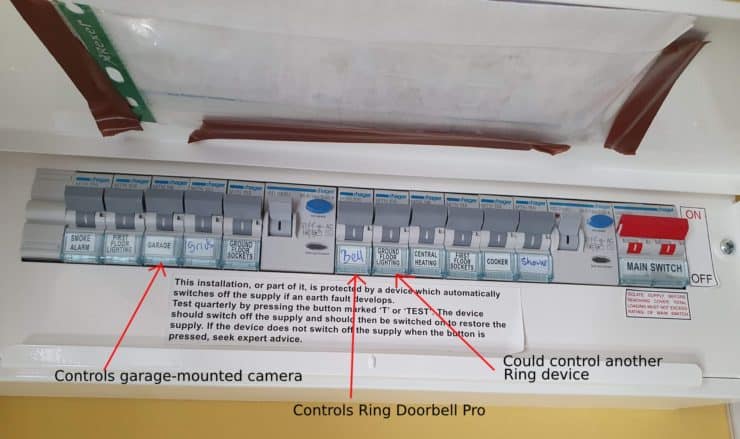
This might not be practical if you have a small number of individual circuit switches (such as “downstairs”, or simply a few unlabelled fuses), but it can be good with a more modern installation.
It might be that if your whole household is all outdoors for the evening, you won’t need your groundfloor lights on – so turning this circuit switch off will disable any Ring cameras powered by this circuit.
Yes, turning power off to your Ring device is a bit of a heavyweight solution, but it could come in handy in your specific case.
Option 4 – Use a Physical Barrier
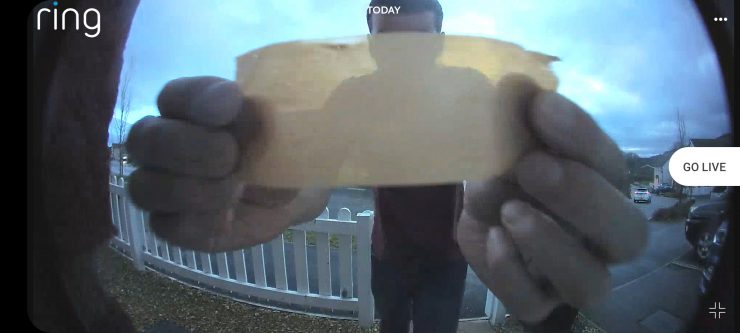
Finally, if none of the other options are feasible, you could try the old school solution of simply covering up the camera lens.
A bit of brown tape works well, but make sure the tape you use isn’t too sticky or it’ll leave remnants behind which can effect subsequent recordings.
Alternatively you could try moving a plank of wood (or similarly long building material) to rest against it, covering the lens in the process.
Of course, this all assumes that the Ring camera is accessible and isn’t at the top of your roofline!
Option 5 – Turn Off Ring’s Internet Access
Since Ring devices don’t have local storage (without paying a fortune), if they lose access to the internet, any recordings will also get lost. Maybe some Snapshot Captures will be uploaded, but full HD recordings won’t be.
Before you shout at me for telling you to turn your whole house’s internet access off, there’s a better way than turning your router off.
In-fact there’s two ways:
- Some routers offer a ‘guest network’ feature. You could enable this and have all your Ring devices connect to this, and then flip this feature on/off when you want to temporarily disable recording.
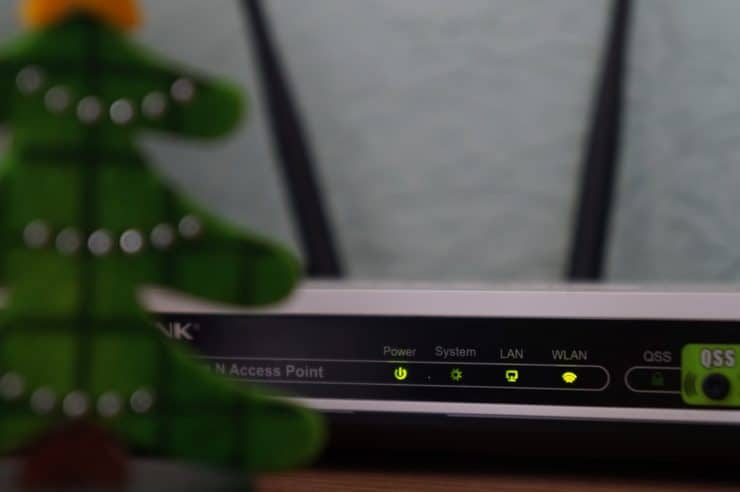
- Buy a second internet router which acts as a WiFi repeater, and then use this second router solely for your Ring devices. You can plug this router into a smart plug, and turn off access easily when you’d like (or just do the manual thing and unplug it, of course!) – thus stopping your Ring cameras from uploading their video capture to Ring’s servers.
Some people isolate their smart home network (via a VPN, guest network or second router) anyway out of privacy concerns, and this is a similar idea.
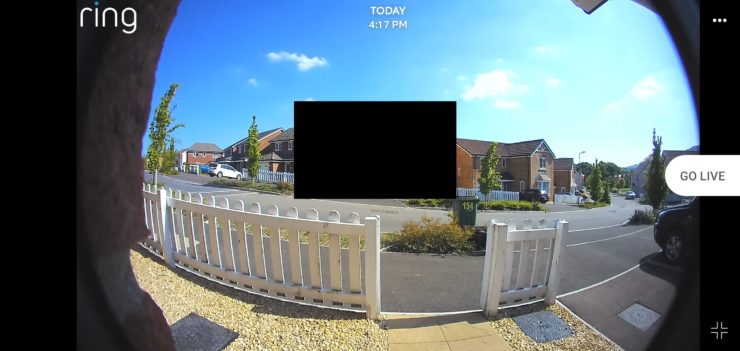
Option 6 – Privacy Zones
Ring rolled out a new ‘Privacy Zones‘ feature in December 2019 (available to some devices), and backported it various other Ring Doorbells throughout 2020 and 2021. It should now be available to all Ring devices.
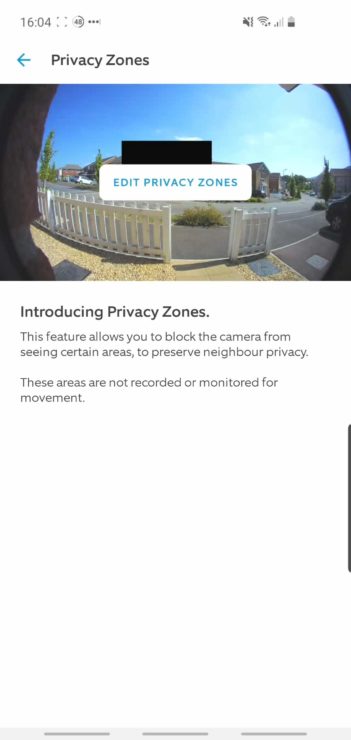
Privacy Zones are designed for blacking out a particular area of a Ring camera or doorbell’s footage capture, so that no recording (or motion detection) occurs in that zone.
It’s like how you can choose specific motion zones in hardwired/plugged in Ring models, and it’s a fairly nice option for ‘stopping recording’. I mean, recording will still happen with Privacy Zones – but you can draw a black box around the entire field of view, rendering any recordings useless.
To do this, go into a Ring device in the Ring app and go to Device Settings and then Privacy Settings, before selecting the ‘Privacy Zones’ feature. Here you can click “Add a Privacy Zone” to go into your camera’s live view, and then click the “+” (add) icon in the top right to start drawing your blacked out area:
Then click on save and any subsequent recordings won’t contain this blacked out area:
This is a great option if you either want to permanently black out a certain part of your property, or you’re going to be out your backyard for a long time and want to black out this area (just add a zone before you go out, then delete it when you come back in – it takes 1-2 minutes in total).
If you have any questions, feedback or suggestions about this article, please leave a comment below. Please note that all comments go into a moderation queue (to prevent blog spam). Your comment will be manually reviewed and approved by Tristan in less than a week. Thanks!